Grainline Scout Woven Tee

I don’t know why it took me so long to get on the Grainline bandwagon. I’d been fangirlish in the reading and looking for a long time, but oddly enough, took a while to get around to making something.

Finally, recently, I jumped in and started with a scout woven tee. And then another.

Round one, testing for fit. I made one with an old shirt of Rob’s. When I say old, I mean, he’d worn it a few times, then torn it on a fence, so the fabric was still in really good nick. And made from red & black tartan/checked cotton. So exactly perfect. I used the back of the shirt to cut the front pattern piece for the scout. Partly because I wanted to get a good sense of fit with the dart-less pattern and also because I like buttons down the back…so the back of the blouse is cut from the front of his old shirt. And the original shirt sleeves had enough fabric in them for me to cut the sleeve pieces and the bias binding for the neckline.

I. Love. This. Top.

OLYMPUS DIGITAL CAMERA


I don’t yet have a decent photo of the button up back (complete with chest pocket!) but I’ll try and get one. The buttons aren’t sufficient to stop gaping in the back, so I’ll need to add some press-studs or something, but I still love it.

Onto round two. SILK SCOUT. And a lesson in why we can’t have nice things.

Problemo numero uno: the fit is really a bit on the generous side in the soft drapey fabric, compared with the cotton shirting. Also, I realised while sewing the second top that the pattern called for 3/8″ seam allowance, not 5/8″. I can’t remember for certain, but I have a sneaking suspicion that I sewed with a bigger SA on version one. All things considered, the fit is a bit on the ample side in version two.

Problemo numero due: I can’t be trusted with lovely fabric. I pre-washed it with a gentle detergent (Soak; same as I use for handknits). I don’t like to dryclean unless it’s absolutely necessary. After the first wear, the top bore a couple of mysterious small marks. I had no idea what and they looked a bit greasy, so off to the drycleaners. Came back spotless. Excellent. Second wear, getting ready for work, spilt porridge down my front while simultaneously eating breakfast and trying to read a case on my phone. I tried to wash it out immediately, but the mark remained, probably now also ruined by a water mark, notwithstanding my attempt to remove the stain, wash and dry immediately. So – in for another soak. Third wear, realised the porridge marks are still faintly visible and what’s more, I got deodorant on the top while I was putting it on.

Honestly.

There were a couple of minor other things – for instance, as you can see below, there’s a bit of pulling as I’ve eased the neckline binding in place, so it’s not perfect. A similar issue with one of the sleeves. But otherwise I’m happy with the sewing. French seamed everything. Invisible hand-stitched hem.

I love this top but if I ever want to wear it out again there’ll need to be some sort of miracle.

Here she is, in all her former glory.

The Cursed Scout

The Cursed Scout

The Cursed Scout

The Cursed Scout

Wow, what a face.

Bronte top of awesome

An Ode to the Jennifer Lauren Vintage Bronte Top!

This top just about takes the cake as my favourite item I’ve ever made for myself. I think I wore it to work three times in the first week after I made it (sorry not sorry) – once with a suit and the other times just with regular skirt or pants.

It’s made from a very fine merino knit, which I bought on a spur-of-the-moment visit to the tessuti sale this winter. I specifically bought the fabric with this pattern in mind.

Whatever my views about self-published pattern designers, this pattern really impressed me. Maybe other knit patterns are the same and I just haven’t tried enough to be sure, but at each step I thought “Wow – Jennifer has really thought about this”. The size and shape of the neckline binding piece is millimetre perfect, which is very helpful for someone like me who tends to the slapdash when it’s a quick weekend project. I like maths, but the thought of the engineering involved in getting this exactly right, using stretchy fabric, kind of blows my mind. The thought that went into the placement of pattern pieces in the PDF for download is noticeable.  The instructions are easy to follow and guide you through the different issues you need to think about when sewing with knits. The whole thing just works.

But most importantly, I love the design. It appealed to me from the first time I laid eyes on it and now I want to make more! I like wearing fitted, stretchy tops in both winter and summer at work, because I can wear them comfortably under suit jackets and they work well with high waisted skirts and pants – I like to tuck in my shirts. And that neckline. So comfortable. And so flattering.

So here she is – the first of many, no doubt. I’m a bit dishevelled after a walk on the beach, but I couldn’t resist using holiday scenery as a backdrop. And I really haven’t mastered the camera, sorry. To borrow from Dolly Clackett, please ignore the derp face. Posing for photos is not one of my mini super powers.

Bronte Top at Urquart Bluff

Bronte Top at Urquart Bluff

OLYMPUS DIGITAL CAMERA


Close up of the best bit – the neckline, with vintage buttons bought (I think) from the Love Vintage Fair at Melbourne Exhibition Building last year. I’m a sucker for buttons.

Bronte top with Vintage Buttons

Bronte top with Vintage Buttons

I don’t own an overlocker, so I made the whole thing with my sewing machine – the old Singer, not the new precious. It went fine. I think I’d like to have slightly more stretch in the sleeve hems, but otherwise fine.

Here you can see the side seams (look, no seam finishings necessary!) and the waist hem, folded under twice and top stitched.

Bronte top hem

Bronte top hem


Finally – confession time. Two problems of my own making.

Problem the first: I accidentally nicked the fabric near the shoulder when I was trimming the armhole excess fabric around the seam. I patched from behind with a sliver of fabric and then zig zag stitched tightly in several directions across the snip, to hold the pieces together. Because the thread matches so closely, it’s barely visible on the outside (thank god). Here’s the inside.

Bronte top accidental snip!

Bronte top accidental snip!


Problem the second: the right side of this fabric has a very slight sheen to it. Unfortunately, I realised only after stitching the front binding of the neckline – perfectly! – that I had sewn it onto the wrong side of the fabric, so that the shiny side faced inwards. Doubtless only I would notice it, but I knew it would annoy me if I left it alone. So I had to sacrifice my PERFECT first ever stretch neckline by turning it over, a bit like finishing a neckline with bias binding, and top stitching it onto the correct side of the fabric. It’s a bit bulkier and I don’t like it as much as the way it’s written, but still sits ok. A la view from inside, below:

Bronte top guts - showing neckline binding

Bronte top guts – showing neckline binding

That’s all folks. If you have been hovering on the edge of making up this pattern, do it immediately. You won’t regret it.

Longest-WIP-in-the-Carita-Manas-catalogue

I swear I recognise your shape / Haunting, familiar, yet, I can’t seem to place it / Cannot find the candle of thought to light your hem /

Ok ok I’m not funny. But seriously, I started making this skirt in NOVEMBER 2009!!! It was the first garment I started sewing after taking a few beginner classes at Thread Den. I got to the point of finishing the waistband.

By the time I had my own sewing machine, a couple of years later, it didn’t fit me. So it sat in the unfinished pile of doom. Languished in fact. For almost five years.

I finally dragged it out to finish, before Japan last year. It’s made from beautiful wool from Tessuti. (in 2009). I eventually decided to sacrifice the front panel, cut a wider one, and add a creatively-named accidental ‘button tab’ to the waistband to extend its length. Not perfect, obviously. And the hem would be better hand sewn than machine stitched, but I was about to fly overseas so, you know, busy.

But I love it. And it gets a lot of use, so that’s the main thing.

OLYMPUS DIGITAL CAMERA


Did I mention I like Pearl Jam? Eddie Vedder on the brain…

Sailor shorts

I won’t lie. These shorts sat in an unfinished pile of doom for a long time. I had started making them last summer, prior to holidays at Aireys, but didn’t follow the instructions, stuffed up the front panel, stretched out the waistband and then got grumpy and put them away.

A little while ago I finally got the nerve to unpick them and inspect the damage. Turned out the waistband was salvageable with some careful re-pinning and slow stitching and I just needed to cut a new piece of facing for the front section and the damage could be fixed. Not so hard.

Buttonholes on the other hand…I have a beautiful old singer machine, courtesy girlprinter’s mum, but no buttonhole attachment = world of pain. And these shorts have two layers of almost-denim. In black. My eyes, my eyes!! Also, after 8 buttonholes I basically wanted to stab someone.

But they’ve done the trick this summer. Comfy and they fit reasonably well. The pattern is this one from Thread Den, for the second time. This one fits better than the last. But even though denim was a recommended fabric choice, I don’t think I’ll make them again and especially not in a heavy weight of fabric – it’s too many layers around the tummy. Underneath that front panel, the two sides of the waist meet and button, so there’s three layers with buttons right in the front of the pants.

Say hello to Tosca, who helped! In addition to the aforementioned Singer and the lovely Tosca, Girlprinter gets credit for the lovely sunny spot, these photos and my knitting skills, among other things.

OLYMPUS DIGITAL CAMERA

OLYMPUS DIGITAL CAMERA

OLYMPUS DIGITAL CAMERA

OLYMPUS DIGITAL CAMERA

Adventures in Japan

CK&RC

I barely know where to start with this post. Believe me when I tell you that the selection of photos I’m including in this post is edited down. I’ll focus on the sewing & knitting inspiration for today. I will need an entirely separate post to chronicle the beautiful kimono I brought home.

We were in Japan for a little over two weeks. It was around new years, which, as it happened, put a real dent in our usual travel itinerary. Because of the public holidays either side of new year (shogatsu) there was a lot that wasn’t open while we were there. Out-of-the-way fabric stores fell into that category. As did museums, art galleries and other public places which in other countries are more likely to be buzzing over the holidays. Nonetheless, we found plenty of adventures. We ate all the a lot of ramen. We wandered the main streets of many prefectures. We went skiing. We saw snow monkeys. We loved the trains and the noise and the people and the onsen and the food. Everything about Japan was wonderful (with the possible exception of its coffee!). I would go back in a heartbeat.

You could, over two weeks of travel, easily spend most of your time doing crafty things. Exploring giant stationery stores, gazing at art, learning about calligraphy and hanko and kimono. And of course, spending all your pocket money on yarn and fabric. I didn’t buy a copy of the Tokyo Craft Guide (although if you’re going to spend two weeks doing crafty things, you probably should) but I did refer often to the posts on its blog. I was also lucky enough to have Gillian’s top tips for Japan fabric shopping, which was wonderful! There’s also a good shortlist on Tomatoes & Jasmine.

So, even though my husband is threatening to make me start a ‘pointless walk jar’ for all the trips to closed fabric shops that marked our travels, you will see from the post to follow that I wasn’t really deprived.

avril night

Kichijoji

Just go there. Seriously. It’s twenty minutes from Shinjuku on the train. And it’s gorgeous. Old, new, cute, big, noise, mess and fun. For the Melbournians, it’s the nearest thing to Fitzroy you could imagine in Tokyo.

In Kichijoji I spent an absurd amount of money on about 3 buttons [*cough* worth it *cough*] and had several small brain explosions in Avril Yarn Store.

Beautiful vintage buttons from L.Musée:

black buttons

blue buttons

Avril was a beautiful store to visit. Many threads and yarns for weaving, probably more so than for knitting or crochet, but such fun to look at!

avril1

avril3

avril4

I came away with a 200g cone of wool/silk “Peinee” yarn in mist.

wool cone

wool

I also popped into Yuzawaya on a separate trip to Kichijoji. It’s big. It’s got pretty much everything. It takes up about 3 floors of a big department store building. And it does have some really stunning fabrics. But I was a bit tired and grumbly and at the end of a long day when I visited this shop, so didn’t leave with anything. I did, however, enjoy some eye candy. Corduroy Liberty for goodness’ sake!!

liberty

tailoring

liberty2

Unfortunately Cottonfield (Gillian’s favourite fabric store!) had closed down before I visited, but apparently they still have a notions shop in Kichijoji and if the reviews of the original fabric store are anything to go by, I’m sure it’s lovely. Worth a visit if you can find the time (which I could not)!

Other fun things in Tokyo

Rob and I dedicated one morning to choose our own adventures. Rob set off for Akihabara (electronics town) while I set out for the famous Nippori Fabric Town. A whole street of fabric stores! Zip shops. Button shops. Second hand fabric. I wore a backpack and sensible shoes, took the camera and prepared to be overwhelmed.

I followed the signs from the train station…

nippori

…and looked out for the bunting and a street lined with tables of fabric…

nippori2

nippori3

…but alas that was the extent of my adventure. Tomato, the biggest store there, had closed for the new year break (the dates were on the website, but I misread them aaarrrgh) and just about everything else was closed too. So that was that. I’ll save it up for the next Japan adventure.

Continuing along the theme of events causing epic stroppiness, I decided to try and find Odakaya in Shinjuku before meeting Rob as planned. I had no WiFi on my own, got lost in the wrong bit of Shinjuku station and tried to rely on the kind directions given by a cafe waitress in half-Japanese-half-English…and failed badly! I did find Odakaya later, with the help of Rob’s WiFi, but to be honest I was underwhelmed. And I would recommend looking at some blogs which offer directions on how to get there, because I found it a bit tricky!

In Things Which Are More Fun, on a later part of the trip we visited Harajuku. We had fantastic ramen, on Spicy’s recommendation, and then bustled through the busy streets with (it seemed) half of Tokyo. We accidentally stumbled upon a pop up shop in front of the bank on a busy corner, selling second hand kimono, yukata, haori, obi and fabric scraps. And seriously, for cheap. I unwittingly picked some Meiji-era kimono and bought them for a stupidly cheap price and will blog about them another time in reverential tones. But for now, here is the shop and a picture of some yukata fabric offcuts I bought there:

harujuku2

harajuku3

yukata fabric

If you’re interested, a yukata is a cotton kimono for wearing around the house. They were provided as part of our stay in our little ryokan in Kyoto, as demonstrated in the next photo. I was in love!

yukata kyoto

Finally, while in Tokyo, I should mention the La Droguerie and 100 Idees outlets in the Seibu Department Store, Shibuya. Knitters, be warned: La Droguerie is pretty! I didn’t buy anything there in the end, but I did stop to take photos of the beautiful store:

yarn-shibuya

yarn-shibuya2

yarn-shibuya4

In the 100 Idees section of the Department store, I did take the opportunity to snap up some Clover bits and pieces for much better prices than at home.

rotary cutter

embroidery scissors

ruler

Kyoto

In Kyoto, there were a couple of places I wanted to visit (such as Habu Textiles) which simply weren’t open. However, I did find the Shijo Nomura Tailor Store, which was as excellent as several reviews had promised.

Several floors of fashion fabric. Walls of buttons. Long sections of remnants. Quilted materials. Fleecy plaid. Felt. Sparkles. Nani Iro. Liberty of London. Stripes, spots, tartan, floral – they had everything. Somehow, unlike some of the other big stores I’ve been to (both at home and in Tokyo – like Odakaya and Yuzawaya) I felt really inspired here. Maybe the fluorescent lights weren’t so blinding. Maybe it was because it was my first morning in gorgeous Kyoto. Maybe it was the fact that things were a bit more orderly. I don’t know. It was just such a great shop and I’m glad that Rob had me on a time limit, or I may not have emerged.

This is the shop:

kyoto2

kyoto4

kyoto5

kyoto6

And these are the treasures I brought home:

striped knit

tartan

After the fabric shopping, we had a lovely lunch around the corner (with beer, naturally) and then rambled through Nishiki markets. Which were amazing. So many pickles. More chopstick shops than you’ve ever seen. Robert bought his own seal. I bought some snips.

snips

Aren’t they gorgeous? They came in a little paper box and wrapped in gingham-patterned paper, which did somewhat add to the charm. Between the snips, the embroidery scissors and the rotary cutter which were now in my suitcase, I was beginning to wonder whether I’d be allowed on the shinkansen back to Tokyo.

The source of the pointless walk jar remark above was our trip to the Nani Iro Atelier in Osaka, which was closed when we got there. And, as Rob remarked, there was not a single other person on the street, which he didn’t think was possible. Someone please go there and tell me whether it’s as awesome as it sounds!!

nani iro

No visit to Japan is complete without reference to stationery. Please be sure to visit Ito-ya. You won’t regret it.

origami

pens

And finally, because everywhere we went there was something beautiful, here are some examples from an ikebana installation in Rappongi Hills. Because in Japan, they just do things right.

ikebana

ikebana2

To Japan: arigato gozaimasu. You were wonderful. x

Top 5 of 2013

I am loving reading the blog round ups for the end of the year. Mostly to see everyone’s pictures again!

I’m in Japan right now, following Gillian’s most helpful tips for finding sewing shops and other lovely places. So this comes to you from my i-device!!

So:

1. Most worn

These black pants. I wear them for work probably twice a week. They’re far from perfect, especially after a zip-related disaster. But they’re a good shape for me and comfortable. And I’m very glad I converted the front from a button closure to pockets! *pats self on back*

I can throw on a jacket with them and often wear them with a mustard coloured, long-sleeve silk blouse. Or with the blouse at number 2…

2. Second most worn item!

It’s a bit of a stretch to include this category, but whatevs.

I made this blouse to wear for frocktails. I was still sewing buttonholes half an hour before the time to arrive! And true confessions – *whispers* still haven’t hemmed the darn thing! Oops.

Anyway, I love the shape of the blouse and the keyhole neckline, love the fabric and colour and wear it a lot for work and going out.

3. Absolute favourite thing

My black circle skirt, hands down. I took time to finish it all properly, so the inside and the outside are pretty. The jacquard fabric has bounce so it practically flounces itself. Plus, it’s twirly.

4. Things I’ve learnt

Mostly these are knitting related actually. I have LOADS to learn in the world of sewing, but I can kind of manage to throw something together in a haphazard way and make something resembling a wearable item (possible exception was learning boning and shirring in preparation for last year’s NYE party and following Amanda’s lapped zip tutorial for my circle skirt).

Knitting, not so much. Every step just about involves something new. First finished garments, first lace pattern, first chart, first wrap and turn, first short rows, &c. And I tried a lot of different ways to tension my yarn, so as to avoid RSI, finally finding something that worked for me.

When I don’t know how to do something, I look on YouTube or google it. There is ALWAYS an answer out there. Or I take it to crafternoon and ask my knitting oracle, Carolyn.

I’ll always sew a little bit, come what may, because it’s necessary – when you’re short like me, hemming and mending will always be virtually essential skills! But I hope I always knit too, because I’m falling in love.

5. Favourite item for someone else

Definitely the chenille chevron blanket for my loveliest friends’ baby.

20140101-210235.jpg

And now for evidence of lovely Japan purchases:

20140101-210336.jpg

Holiday sewing – circle skirt

Skirt's first night-time outing

Skirt’s first night time outing

Polyester horsehair braid, handstitched

Polyester horsehair braid, handstitched

I love my new circle skirt. It took me a lot longer than I anticipated to make it, not least because hand sewing the horsehair braid into the hem to add stiffness took approximately 5 million hours. But I’m glad I took the time to do it properly.

I mainly followed the sew-a-long at Casey’s Elegant Musings and some of the online tutorials from Gertie.

I made it using beautiful polyester jacquard from Tessuti: here.


Inside of waistband, handstitched down

Inside of waistband, handstitched down

Waistband - piping detail

Waistband – piping detail

A couple of issues in the making – when I sewed it all up, the waist on the skirt (before I attached the waistband) was too big. I’m not sure how – perhaps the fabric stretched. Perhaps I allowed a wider seam allowance than I recalled. Anyway, before I attached the waistband I had to take in one of the side seams. I left the seam quite deep, because I’d already bound all the open seams with satin bias binding.

Also – attaching the piping along the waistband was a pretty slippery job and in parts I sewed a bit closer to the edge of the fabric than ideal. To ensure that the inside of the waistband was really secure I decided to pull it down taut and hand sew it in place. More time consuming – but more accurate.

Lapped zipper detail

Lapped zipper detail

Inside of lapped zipper - detail

Inside of lapped zipper – detail

I trawled the internet and my various sewing books for a good lapped zipper tutorial. How is it that they all skip over that pesky issue of the lack of fabric where the seams join, etc etc. Anyway – I found the best tutorial over at Bobbins and Whimsy. Seriously. Read it people.


Yes, that's a pomegranate on the carpet

Yes, that’s a pomegranate on the carpet

Flounce!

Flounce!

It’s so twirly! I love it.

Love Vintage Show

A couple of weeks ago I snuck in a few hours at the Love Vintage Show. It’s a great event and I most love getting to find out who’s selling pretty clothes; both vintage and repro, and putting them in my feed reader or following them on pinterest. I think the show borders on feeling a bit like a theme park, but I just tried to embrace the fun of peeking at other people’s treasures.

What I was hoping to find this trip were some cute buttons and maybe some lace or other haberdashery to use in sewing projects that are on the go or planned.

Here are my treasures!

Victorian lace. I think it’s originally from a corner of a table runner or something. Possibly a collar. I think it would make a nice addition to the bodice of a blouse.

OLYMPUS DIGITAL CAMERA

OLYMPUS DIGITAL CAMERA

OLYMPUS DIGITAL CAMERA

More lace. For…who knows! It seemed handy.

OLYMPUS DIGITAL CAMERA

Gorgeous golden square plastic shank buttons:

OLYMPUS DIGITAL CAMERA

OLYMPUS DIGITAL CAMERA

Glass buttons with silver embossed detail (although to me they look more like bakelite):

OLYMPUS DIGITAL CAMERA

OLYMPUS DIGITAL CAMERA

Tiny purple glass and plastic buttons:

OLYMPUS DIGITAL CAMERA

OLYMPUS DIGITAL CAMERA

High waisted work pants

I decided some time ago that I needed new black pants. My other black work pants had seen their end and I wanted some a little more in my style.

Last summer I made these shorts.

Red Sailor Shorts

Red Sailor Shorts


The pattern is from Thread Den and also comes in pants.

Summer Sweet Shorts - Image courtesy Thread Den

Summer Sweet Shorts – Image courtesy Thread Den

High Waisted Pants – Image courtesy Thread Den

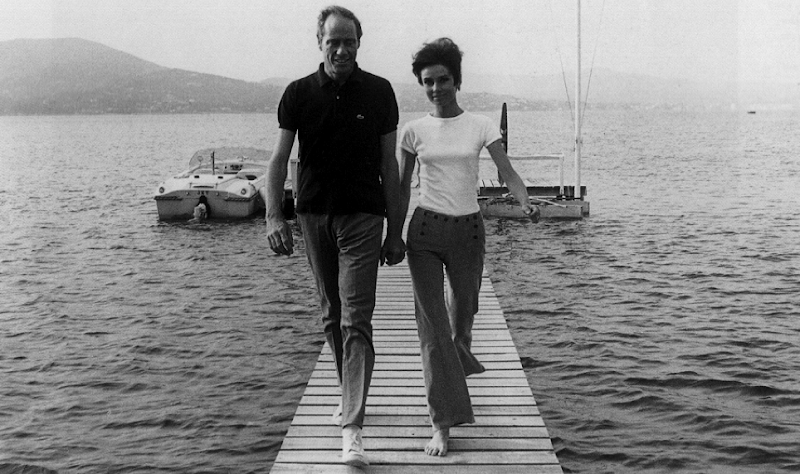
I love high waisted pants. Who doesn’t? Picture women like these:

Katharine Hepburn - in pants

Katharine Hepburn – in pants (image courtesy suckitmartha.wordpress.com)

Audrey Hepburn in sailor pants

Audrey Hepburn in sailor pants (image courtesy tomboystyle.blogspot.com.au)

Lix from The Hour

I decided to use the pattern I already had from Thread Den, but wanted to modify the front to remove the button closures and make them a little more formal in style. I changed the button placket and turned it into self-drafted pockets, relying on Tasia’s wonderful tutorial on slash pockets, designed for her crescent skirt. Sew-along-post here: http://sewaholic.net/crescent-sew-along-11-sewing-slash-pockets/

I had to modify the waistband so that it wrapped right around the waist and added a side closure with a zip. I was a bit worried about the waistband, because it meant that the band would curve right across the grain of the fabric. It turned out ok and I sewed the waistband on by ‘stitching in the ditch’.

Here’s some shots of the work in progress – which was last November!!

Pictures of the finished pants to come!

Gertie’s Tiki Sundress – Shirring & Boning

I am in the midst of making Gertie’s tiki sundress, from Gertie’s Book for Better Sewing:

Gerti’es Tiki Sundress

I did a quick muslin yesterday, explored about 6 fabric shops looking for suitable printed cotton (hoping for hawaiian barkcloth, but no cigar), washed the fabric, left it to dry while we ate tacos, then embarked on the bodice work.

So far, it’s involved shirring and boning in the bodice, both of which are new to me. I remain skeptical about whether the boning will sit right and won’t stab me, but I think it will be easier to tell once the bodice pieces are together.

Rigilene Boning Bodice lining with Rigilene Boning Visible side of lining, with boning channels

The shirring worked really well and I’m looking forward to seeing it in the dress. It’s like magic, the part at the end where you apply steam and watch it shrink! Some dark arts at work.


Shirring

Shirring

Putting the bodice together doesn’t now seem too difficult – however the thought of creating the side draped pencil skirt (today) to attach to the bodice is sort of terrifying. Fingers crossed.